2023. 6. 22. 21:01ㆍReact
import logo from './logo.svg';
//import './App.css';
//import './App.scss';
import styles from "./App.module.css";

console.log(styles);
// {
//   App: "App_App__A3szl"
// App-logo: "App_App-logo__tm8C+"
// App-logo-spin: "App_App-logo-spin__yh9Mn"
// header: "App_header__M7J7p"
// link: "App_link__3kObV"
// logo:"App_logo__0lOZv"
// } => styles 라는 객체

function App() {
  return (
    <div className="App">
      <header className="header">
        <img src={logo} className="logo" alt="logo" />
        <p>
          Edit <code>src/App.js</code> and save to reload.
        </p>
        <a
          className="link"
          href="https://reactjs.org"
          target="_blank"
          rel="noopener noreferrer"
        >
          Learn React
        </a>
      </header>
    </div>
  );
}

export default App;
위 코드를 실행시킨 후 서버를 열어 도구를 확인하면
// {
//   App: "App_App__A3szl"
// App-logo: "App_App-logo__tm8C+"
// App-logo-spin: "App_App-logo-spin__yh9Mn"
// header: "App_header__M7J7p"
// link: "App_link__3kObV"
// logo:"App_logo__0lOZv"
// } => styles 라는 객체
위와 같은 객체가 콘솔창에 찍혀있는것을 볼 수 있고, 스타일 코드부분을 확인하면
위 이름처럼 코드가 바뀌어있다.
vsCode 상의 이름도 위의 이름이 다른 이유로 오염되지 않도록 수정해준다.
import logo from './logo.svg';
//import './App.css';
//import './App.scss';
import styles from "./App.module.css";

console.log(styles);
// {
//   App: "App_App__A3szl"
// App-logo: "App_App-logo__tm8C+"
// App-logo-spin: "App_App-logo-spin__yh9Mn"
// header: "App_header__M7J7p"
// link: "App_link__3kObV"
// logo:"App_logo__0lOZv"
// } => styles 라는 객체

function App() {
  return (
    <div className={styles['App']}>//바뀐부분
      <header className={styles["header"]}>//바뀜
        <img src={logo} className={styles["logo"]} alt="logo" />//
        <p>
          Edit <code>src/App.js</code> and save to reload.
        </p>
        <a
          className={styles["link"]}//
          href="https://reactjs.org"
          target="_blank"
          rel="noopener noreferrer"
        >
          Learn React
        </a>
      </header>
    </div>
  );
}

export default App;
⇒ module.css 는 이런 오염을 사람들이 하지 않도록 도와준다.
활용
Component 폴더 생성 후 Button.jsx 파일을 만들어준다.
import styles from './Button.module.css';

const Button = props => <button className={styles["button"]} {...props}>

</button>

export default Button;
같은 폴더에 Button.module.css 파일도 생성한다.
.button {
  background: transparent;
  border-radius: 3px;
  border: 3px solid palevioletred;
  color: palevioletred;
  margin: 0 1em;
  padding: 0.24em 1em;
  font-size: 20px;
}
App.js 의 a 태그 부분을 지우고 버튼클래스를 추가한다.
import logo from './logo.svg';
//import './App.css';
//import './App.scss';
import styles from "./App.module.css";
import Button from './Components/Button';

function App() {
  return (
    <div className={styles['App']}>
      <header className={styles["header"]}>
        <img src={logo} className={styles["logo"]} alt="logo" />
        <p>
          Edit <code>src/App.js</code> and save to reload.
        </p>
       <Button>Button</Button>
      </header>
    </div>
  );
}

export default App;
+) 로딩상태를 표현해볼것이다.
정보) 이벤트에 바인딩되는 함수는 애로우펑션으로 작성해줘야 그 안에서 this 를 사용할 수 있다.
우선 function 컴포넌트를 class 컴포넌트로 바꿔주고 시작한다.
import styles from './Button.module.css';
import React from 'react';

class Button extends React.Component{
  state = {
    loading: false,
  }; //초기값

  render() {
    return (
    <button onClick={this.startLoading}
    className={this.state.loading ?
      `${styles["button"]} + ${styles["loading"]}` // 함수를 두개 쓰려면 이런 식으로
      : styles["button"]
    }
      {...this.props}></button>
  );
  }

startLoading = () => {
  this.setState({
    loading: true,
  }); //상태를 지정하려면 초기값을 설정해둬야됨
  setTimeout(() => {
    this.setState({
      loading:false,
    });
  }, 1000);
} //버튼을 클릭하면 초기값이 false 였던게 true 로 바뀌었다가 1초 뒤에 다시 false 가 됨

}
export default Button;
- 코드를 보면 우선 로딩하는동안의 상태를 만들어줘야하기에 startLoading 펑션을 만든다. (arrow function 으로 만들어야 this 가 가능)
- 상태지정을 위한 초기값도 설정해준다.
- setTimeout 함수를 이용해 1초 후에 변경되도록 만든다.
- return 해준다.
.loading {
  border: 2px solid grey;
  color: grey;
}
classNames
👉 classNames 는 클래스 이름을 동적으로 조합하고 불필요한 공백을 제거하여 편리하게 클래스 이름을 생성할 수 있다. classNames 를 활용하여 콘솔창에 찍어보면, 참인값만 한 칸 띄워서 출력한다.
  render() {
    return (
    <button onClick={this.startLoading}
    className={this.state.loading ?
      `${styles["button"]} + ${styles["loading"]}` // 함수를 두개 쓰려면 이런 식으로
      : styles["button"]
    }
      {...this.props}></button>
  );
  }
이 부분이 살짝 지저분하게 느껴진다. classNames 를 활용해서 간결하게 바꿔줄 것이다.
import classNames from 'classnames/bind';

const cx = classNames.bind(styles);

console.log(cx('button', 'loading'))
이렇게 classNames 를 import 하고 콘솔창에 찍어보면
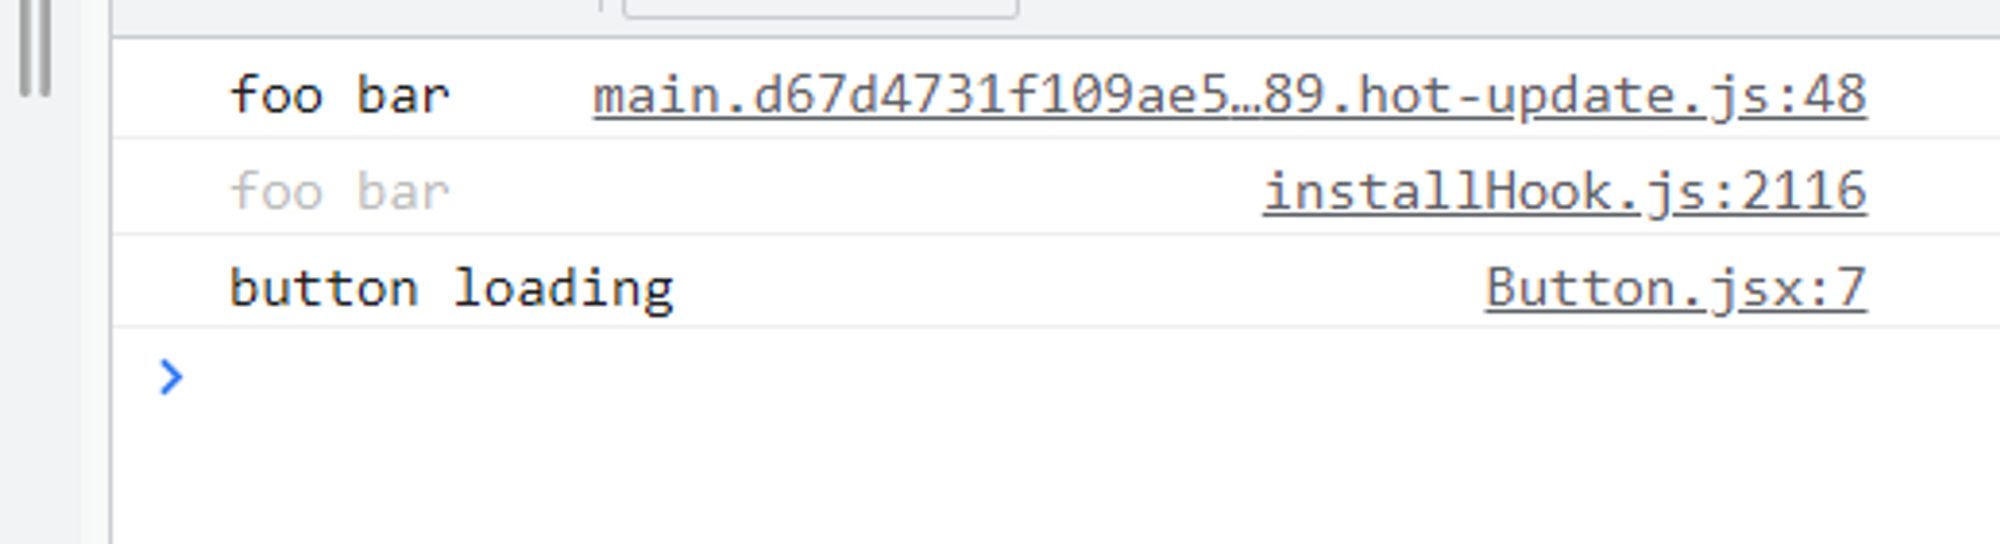
이렇게 뜬다. 이걸 활용해서 코드를 바꿔줄 수 있다.
return (
      <button
        onClick={this.startLoading}
        className={cx("button", {loading : this.state.loading})}
        {...this.props}
      ></button>
    );
render 안의 return 부분을 이렇게 바꿔주는 것이다.
그럼 classNames 의 특성으로 인해 loading 이 참일때 즉, loading 의 state 가 true 일때 실행되는 것이다.
'React' 카테고리의 다른 글
| [React] Hooks 알아보기 ( useState , useEffect ) (0) | 2023.06.23 |
|---|---|
| StyledComponents(버튼) 알아보기 ! (0) | 2023.06.22 |
| props 와 state (0) | 2023.06.16 |
| React Component (1) | 2023.06.16 |
| [React] 리액트 라이브러리 (리액트 이전의 프론트엔드) (0) | 2023.06.16 |